The Voracious Resurgence | |
| Prime Weapons • Ultimate Weapons • Ultimate Augments • Abjurations iL119 • JSE Necks • Divergence Augments • Escutcheons | |
| Reforged Armor Artifact: +1 • iL109 • iL119/+2/+3 Relic: +1/+2 • iL109 • iL119/+2/+3 Empyrean: +1/+2 • iL109 • iL119/+2/+3 |
Guides • Crafting • Trusts • Apex Monsters |
User talk:Dumo/Sets
Purpose of this Guide
To have fun making something I like and do more with a job I enjoy. This will be more of a play style guide. I want to cover early gearing and progression, jobs a BST should be performing in content and ideas for further playing in the job. I won't be going into every aspect of the job but what I will cover should be plenty to not only get a player started on BST but get through content at a high level. From there, it's up to the player to expand their knowledge and abilities. The "Killer Intinct" guide on AH has a lot of information and testing on all aspects of the job. I would suggest reading through the forum posts to really deep dive into the job.
Why BST?
BST is a versatile job that unfortunately isn’t used to the full extent of the job by the community. It can be very inventory intensive to get everything out of the job. Carrying multiple jugs for pets, pet food, multiple foods depending on what you are doing and the gear for both master and pet, your inventory and wardrobes can fill pretty quickly. This is a problem for someone like myself that wants to experiment with the full array of options but it doesn’t have to be so rough if you just need the job to perform some common tasks that are typically asked of a BST in the current endgame.
The most common tasks asked of a BST today are to control mob tp in some fights, particularly Mboze, and to spit on Odyssey NMs for a 10% hp down during rp farms. This certainly isn’t all the job has to offer but the reality is, that’s the most common times you get to break the job out.
Roles and Functions
| Collapse | |
|---|---|
| Communicator | You are going to need to communicate with your group while on BST. Simple things make a big difference. This isn't abnormal when comparing to other jobs but some of what you are going to do is important to know. Often we will do an AoE debuff that wakes up the mobs. You need to communicate that things are going to wake up so the crowd control player can sleep them again. When sucking tp, you are typically the measure of how well the tp is being controlled and the amount of tp you drain being too high is a signal to slow down for a cycle to get back under control. |
| Debuffer | You have some very powerful debuffs. AoE 33% attack/defence down is no joke. MDB-25 is big. Knowing what you need for each situation is important. Most of this is AoE or conal which means you will often have to explain this to the group. |
| Crowd Control | You have different ways to control situations. A wide cone stun can lock down areas when things go wrong. |
| Damage Dealer | BST is quite capable of dealing damage. It isn't a heavy dps like WAR but it is capable of getting a lot done. Often this will not be the main focus but is nearly always the secondary job. There are times where you stop doing damage to focus on something more important but otherwise, you add damage because otherwise you are standing around doing nothing and that's not fun nor is it helping the group in a way you can help. |
| Cheese! | This will be covered more but in Odyssey, you will be doing RP farms to upgrade your augments. You have access to a 10% hp down which is all you need. This takes a lot of pressure off the group trying to figure out compositions when you can go in on BST, do the 10% and everyone else can be on throwaway jobs. Sometimes a group can afford a bring a tank and hold the mob, sometimes they can bring someone with reraise but often, you are going to die doing this task. The best news here? You need to do more ep to get the lost ep back and that means more time on BST! |
| Random Other Things | You have a LOT of pets that can do a LOT of different things. In low man groups, you can fill random roles for small things. I've done everything from skillchain opener to statue nuker to main healer for cp parties. |
Abilities and Traits
Merit and Job Points Progression
Master Levels
We need to discuss Master Levels however brief this will be.
Every Master Level earned, the player receives the following for that job:
- +1 STR, DEX, VIT, AGI, INT, MND, and CHR per level
- +1 to the cap of Combat Skills and Magic Skills per level
- +7 Maximum HP per level
- +2 Maximum MP per level
- +1.5 Pet: Attack per level
- +1.5 Pet: Accuracy per level
- +1.5 Pet: Defense per level
- +1.5 Pet: Evasion per level
- +7 Maximum HP per level
Every 5 Master Levels will grant you an extra Sub Job Level.
Master Levels can play a large role in the abilities of a job. Pet jobs gain extra benefits and with the increasing of our pet levels through food, this all adds up to making a big difference. Especially when we want to land things on harder mobs. That's not to say that you need to race through your Master Levels. Just that they are good to have.
Common Pets
There will be more pets added as we go and an explanation of their uses. In the mean time, here are 2 pets that you will be asked to use and are the ones players think of when BST is mentioned.
Jug: Dire Broth (Lv.99) | |||||||||||||||||||||||||||||||||||
|---|---|---|---|---|---|---|---|---|---|---|---|---|---|---|---|---|---|---|---|---|---|---|---|---|---|---|---|---|---|---|---|---|---|---|---|
| Type | Amorph | Family | Slug | Special Traits | |||||||||||||||||||||||||||||||

|
Melee Type | TP/hit | 75 | MDB +40 En-Slow:(15% Slow) -50% -30% -50% + | |||||||||||||||||||||||||||||||
| Level Cap | 119 (119) | Attack ± | -20% | Defense ± | +30% | ||||||||||||||||||||||||||||||
| Maximum Level Stats | |||||||||||||||||||||||||||||||||||
| |||||||||||||||||||||||||||||||||||
| |||||||||||||||||||||||||||||||||||
Generous Arthur is basically your ticket in groups. A 33% Attack and Defense down effect is massive. This is AoE and will wake mobs up so remember to communicate when performing Corrosive Ooze. Mobs can be slept after the initial damage. This move does not have a Magic Accuracy check and just lands.
The other move available is Purulent Ooze. This insane thing is HP-10% and on mobs with massive HP pools, this is the hardest single hitting move in the game. The mobs HP drops by 10% and they don't get it back. This only works at the beginning of the fight as after the 10% is taken off, either by Ooze or by regular damage, this no longer reduces the mobs health and instead is nothing more than a way to screw with people watching the HP bar. The move is rather limited in most situations but can be huge when applicable. This will again be your ticket into Odyssey RP farms and sometimes Dynamis Divergence Wave 3 clears. You generally want to be using this with as much Magic Accuracy as you can.
Purchase Meaty Broth from: Theraisie - Upper Jeuno (G-6) - M&Ps Market
Jug: C. Plasma Broth (Lv.81) | |||||||||||||||||||||||||||||||||||||||||||||||||||||||||||||
|---|---|---|---|---|---|---|---|---|---|---|---|---|---|---|---|---|---|---|---|---|---|---|---|---|---|---|---|---|---|---|---|---|---|---|---|---|---|---|---|---|---|---|---|---|---|---|---|---|---|---|---|---|---|---|---|---|---|---|---|---|---|
| Type | Amorph | Family | Leech | Special Traits | |||||||||||||||||||||||||||||||||||||||||||||||||||||||||

|
Melee Type | TP/hit | -50%SDT -25%SDT + | ||||||||||||||||||||||||||||||||||||||||||||||||||||||||||
| Level Cap | 99 (114) | Attack ± | Defense ± | ||||||||||||||||||||||||||||||||||||||||||||||||||||||||||
| Maximum Level Stats | |||||||||||||||||||||||||||||||||||||||||||||||||||||||||||||
| |||||||||||||||||||||||||||||||||||||||||||||||||||||||||||||
| |||||||||||||||||||||||||||||||||||||||||||||||||||||||||||||
Mr. Fargann holds a very particular place in todays endgame. Realistically, you are expected to use 1 move and that is TP Drainkiss. Often a go to when a mobs TP moves are just too dangerous to mess around with. Looking at you Mboze. There is NO Magic Accuracy check. This runs entirely off pet TP. At 3000 TP, TP Drainkiss will take 100% of the mobs TP. This is a good time to discuss some of how Ready works and explain the simple math that makes this work.
If your pet is below 1000 TP when you use Ready, your pet's TP will be set to 1000.
Fatso Fargann is a Warrior which means he gets the job trait Fencer. That is +500 TP.
We get a TP bonus of 40 from Job Points
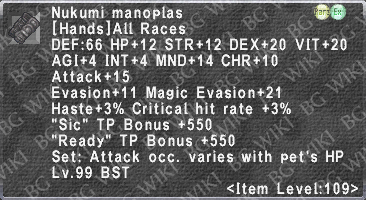
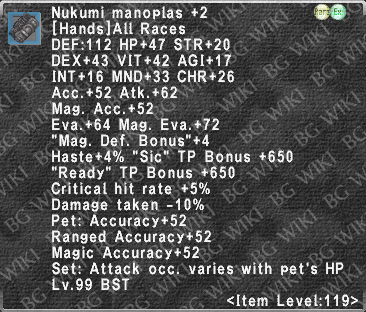
BST Empy gloves add a TP bonus starting with Nukumi Manoplas (550) and going up by 50 until Nukumi Manoplas +3 (700)
For a weapon, you have 2 options. Aymur (500 in precast and 500 in midcast) or Kumbhakarna with ![]() : TP Bonus +200. Note you can dual wield these if you aren't in Odyssey.
: TP Bonus +200. Note you can dual wield these if you aren't in Odyssey.
So we get...
1540 from Ready and Fencer and Job Points
550-700 from Empy Gloves
1000 From Aymur or 200-400 from Kumbhakarna
If we look specifically at Odyssey, we can use Nukumi Manoplas with Aymur to break 3000 TP or we can use the Nukumi Manoplas +3 with Kumbhakarna to reach 2440 TP. You may look at those numbers and assume you need an R15 Aymur to do your job! But you really don't. First, the 75 version grants the same TP bonus. Second, you can get the job done just fine on Mboze V20+ with just Nukumi Manoplas +2 and Kumbhakarna. That's right, not even the max from the gloves. It will however be a bit more sketchy. Especially on the V19 and lower when you are trying to do it in 1 KI and not using Mboze's pet for TP and reducing the TP feed. However, plenty of people have managed.
Purchase C. Plasma Broth from: Auction House
New Players
In this section I will introduce Pets, Sets, Content to work towards and try to outline what you should be doing in content with other players. At this stage, I would expect a player to be working on Rhapsodies of Vanadiel and through most of the story content in the game. That doesn't mean you have to get to that point before you can start here. It just means I may suggest equipment that requires you to have access from these things. If you are not through Rhapsodies of Vanadiel, you are not ready to move on to the next phase. You should be able to get Totemic Armor Set and Ankusa Armor Set sets to the +1 versions which are iLVL 119 and the Nukumi Armor Set to the iLVL 109 version. If you can get help with Vagary or clearing the battlefields, you would be able to get to the 119 versions of this set as well. You will be mostly looking towards Ambuscade, Domain Invasion and early Geas Fete. This is a great time to seek out a Linkshell if you don't already have one. You will also want to work towards having Omen and Divergence access for later.
Pets Added
Jug: Livid Broth (Lv.99) | |||||||||||||||||||||||||||||||||||||||||||||||||||||||||||||||||||||||||||||||||||||||
|---|---|---|---|---|---|---|---|---|---|---|---|---|---|---|---|---|---|---|---|---|---|---|---|---|---|---|---|---|---|---|---|---|---|---|---|---|---|---|---|---|---|---|---|---|---|---|---|---|---|---|---|---|---|---|---|---|---|---|---|---|---|---|---|---|---|---|---|---|---|---|---|---|---|---|---|---|---|---|---|---|---|---|---|---|---|---|---|
| Type | Lizard | Family | Hill Lizard | Special Traits | |||||||||||||||||||||||||||||||||||||||||||||||||||||||||||||||||||||||||||||||||||

|
Melee Type | TP/hit | 80 | + | |||||||||||||||||||||||||||||||||||||||||||||||||||||||||||||||||||||||||||||||||||
| Level Cap | 104 (119) | Attack ± | +30% | Defense ± | -20% | ||||||||||||||||||||||||||||||||||||||||||||||||||||||||||||||||||||||||||||||||||
| Maximum Level Stats | |||||||||||||||||||||||||||||||||||||||||||||||||||||||||||||||||||||||||||||||||||||||
| |||||||||||||||||||||||||||||||||||||||||||||||||||||||||||||||||||||||||||||||||||||||
| |||||||||||||||||||||||||||||||||||||||||||||||||||||||||||||||||||||||||||||||||||||||
Warlike Patrick is an interesting pet that gives you a couple options. If your Ready recast delay is low enough, it can do a nice multi step skillchain and even burst it. Unfortunately does not count as bursts in Omen. It can however create Fusion for Dia bursts. Solo, you technically could sub WHM or RDM and set yourself up to get the burst amounts. The issue will be that early on, you are going to be struggling just to get off the first 2 floors. You will need more damage and less playing with side objectives.
The other place I sometimes use Pat is actually in cleaving harder zones. BST certainly is no BLU when it comes to cleaving but you can use Valaineral and Fireball effectively. I typically would go to Reisenjima, pull a group of mobs and create some distance. I engage with enough space to turn around and hit a mob before the animation lock. Val will AoE to grab hate and now you Fireball a few times to get the kill. Without Val, the first Fireball will have the mobs delete your pet.
Purchase Meaty Broth from: Theraisie - Upper Jeuno (G-6) - M&Ps Market
Jug: Bubbly Broth (Lv.99) | |||||||||||||||||||||||||||||||||||
|---|---|---|---|---|---|---|---|---|---|---|---|---|---|---|---|---|---|---|---|---|---|---|---|---|---|---|---|---|---|---|---|---|---|---|---|
| Type | Vermin | Family | Chapuli | Special Traits | |||||||||||||||||||||||||||||||

|
Melee Type | TP/hit | 75 | - | |||||||||||||||||||||||||||||||
| Level Cap | 105 (119) | Attack ± | +10% | Defense ± | - | ||||||||||||||||||||||||||||||
| Maximum Level Stats | |||||||||||||||||||||||||||||||||||
| |||||||||||||||||||||||||||||||||||
| |||||||||||||||||||||||||||||||||||
Bouncing Bertha is the HQ version of Scissorleg Xerin. You can always just use the NQ version but if you get the HQ and only use it with Bestial Loyalty, it can last forever and be a solid investment. This is your main cleave partner. The Puks and Dragons in Escha - Zi'Tah (#2) are the common place to cleave for merits. As a new player, you want to get your merits capped but without a solid way of cleaving, it's a long grind. Tbh, it's a long grind anyways. This will help you to cap the amount of merits you can hold, cap job merits and many other. You can also build merits quickly for spamming HTMB.
Purchase HQ Bubbly Broth from: Auction House
Purchase NQ Spicy Broth from: Auction House
Jug: Meaty Broth (Lv.99) | ||||||||||||||||||||||||||||||||||||||||||||||||||||||||||||||||||||||||||
|---|---|---|---|---|---|---|---|---|---|---|---|---|---|---|---|---|---|---|---|---|---|---|---|---|---|---|---|---|---|---|---|---|---|---|---|---|---|---|---|---|---|---|---|---|---|---|---|---|---|---|---|---|---|---|---|---|---|---|---|---|---|---|---|---|---|---|---|---|---|---|---|---|---|---|
| Type | Beast | Family | Tiger | Special Traits | ||||||||||||||||||||||||||||||||||||||||||||||||||||||||||||||||||||||

|
Melee Type | TP/hit | 95 | - | ||||||||||||||||||||||||||||||||||||||||||||||||||||||||||||||||||||||
| Level Cap | 117 (119) | Attack ± | +60% | Defense ± | -10% | |||||||||||||||||||||||||||||||||||||||||||||||||||||||||||||||||||||
| Maximum Level Stats | ||||||||||||||||||||||||||||||||||||||||||||||||||||||||||||||||||||||||||
| ||||||||||||||||||||||||||||||||||||||||||||||||||||||||||||||||||||||||||
| ||||||||||||||||||||||||||||||||||||||||||||||||||||||||||||||||||||||||||
Blackbeard Randy is another solid physical attacker that can be used early to help you through content. You may be able to cleave in Escha - Zi'Tah but will quickly find that same strategy doesn't work in Omen. Randy can use Razor Fang as a single target move that will deal solid damage without causing a lot of things to aggro and quickly kill your pet.
Purchase Meaty Broth from: Theraisie - Upper Jeuno (G-6) - M&Ps Market
Goals in this Stage
This is for new players more so than old players that are picking the job up. The main goal is to get yourself ready for group content. Ambu, Dyna, Omen. All are worthwhile all around but you will feel pretty useless early on. That’s no different than other jobs though. At least you can Corrosive Ooze to help everyone else do more damage.
So in trying to prepare for content, work on your merits. You want your BST merits done, your axe merits and start working on the number of merits you can hold. The sooner you cap your max merits (75), the easier it is to do the rest.
Pick up a few jugs and start filling out sets. You will want sets for TP and a weapon skill. Set for Call Beast and a pet: physical damage set in order to cleave. You will want as solid of an idle set as you can get for larger pulls and you want as much Damage Taken as you can for events such as Dynamis Divergence so you don’t hit the floor every time a Ninja appears.
Once you have those, you should be able to contribute to group content and at that point, you will want to start working on the other sets. Magical sets, Reward and building your Damage Taken options.
Content to work on
Missions! Get them done. You want to open up your options in the game and this is how it’s done. You will want access to gain access to Omen, Dynamis - Divergence, Vagary and Sortie as soon as you can. You may not be able to get groups to go in yet but you want the access.
In getting access to those, you will get access to Alluvion Skirmish which has a pair of set for BST which are versatile due to the augment system. More on those later.
Domain Invasion is going to be a staple to your day for a while. There are some solid accessories to pull out of there but also easy access for the Geas Fete gear, specifically the Valorous Armor Set which can be augmented for tp sets or pet based sets.
Ambuscade is the beginning of the rest of your life in ffxi. You need the gear sets early on and you will probably always be looking for more JSE Capes. After all that, it’s still some of the most profitable content you can run. Start solo on Volume 2 Very Easy since you will be solo and build up to higher difficulties. Try to get groups together to be able to tackle harder difficulties.
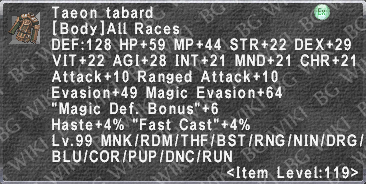
From Alluvion Skirmish, you will be trying to get pieces of the Taeon Attire Set and Acro Armor Set. If you get anything from the Telchine Attire Set, save it, mule it, whatever. You will need them if you start a mage job later.
These sets can be augmented with 3 different augments. You get one augment each from Snow, Leaf and Dusk stones. All have “slit” “dim” “tip” “orb” versions. Which decides where in the chart you are pulling the augment possibilities.
Typically your Acro Armor Set would be getting Call Beast ability delay which reduces your recast. They can also be augmented with pet stats but that can also be put on Taeon.
Your Taeon Attire Set usually gets the pet stats. However, the Taeon Boots come with Dual Wield+4 and can be augmented for a total of +9 which can be a huge help getting sets together for your DW tiers.
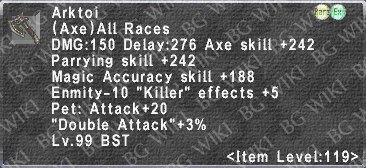
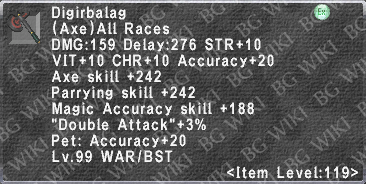
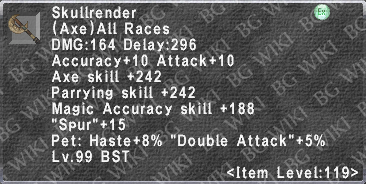
Kumbhakarna is an axe that can be a pain to get compared to the sets. You may want to ask for help or look into the other options to obtain. It can be augmented with Pet: TP Bonus+200 and some Pet:Magic Atk. Bonus which makes for a wonderful axe for pet magic ready moves as well as buffing moves and TP Drainkiss. You will probably want a pair of them at some point.
You can make full pet sets out of Valorous and Alluvion sets but for the most part, I’ve assembled sets that use less of it.
How to perform in a group
Gunna be a bit blunt here but your damage is probably terrible right now. Luckily you have a bunch of options for support. The problem there is you are basically stuck to 1 at a time and it’s not quite as strong as something like a Bard capping haste.
Generous Arthur is basically your golden ticket. Corrosive Ooze is an AoE Attack-33%, Defence-33% which is wild. You will want to communicate when you are tossing this out since it will wake sleeping mobs. The best part of this is that Corrosive Ooze has NO ACCURACY CHECK. It just lands! We have brought brand new players on BST into Wave 3 to land Ooze as we are fighting. Your first run may not be the clear like that but you can still contribute more doing Ooze than pretending your doing any damage yet.
If your group doesn’t want to do Ooze for some crazy reason (probably concerned about mobs being awake), you still have options like Suspicious Alice and using Numbing Noise for a wide conal stun or Geist Wall for an AoE dispel.
Intermediate Players
Pets Added
Goals in this Stage
Content to work on
How to perform in a group
Advanced Players
Pets Added
Goals in this Stage
Content to work on
How to perform in a group
Sets
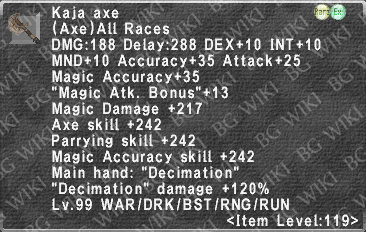
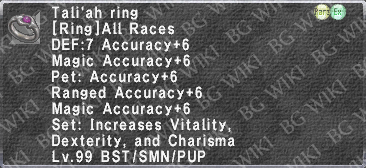
Some of the easier equipment you have access to will be the Meghanada Armor Set and Tali'ah Armor Set. Getting to iLVL 119 is a big first step and this gear is a big jump in stats from where you were. Ambuscade gives you access to powerful weapons with early stand outs being Kaja Sword and Kaja Axe. You will also be able to start building Ambuscade Capes which cover a lot of situations for you.
Idle
We are simply trying to get defensive stats here. Damage Taken, Physical Damage Taken and even Magic Damage Taken where we can. Actual Defense, Evasion and Magic Evasion will all need to be considerations. At this point, you are probably just trying to become tanky enough to farm merits and do some base content. You will certainly want Damage Taken to try to survive if a group brings you into a Divergence run. In this tier, spending will be kept minimal.
|


|


Pet Based Sets
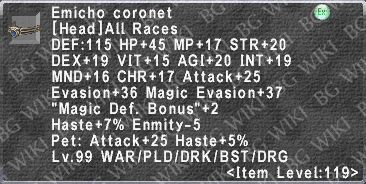
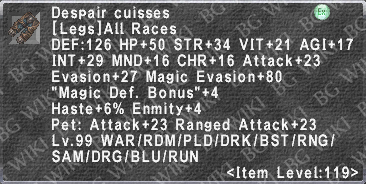
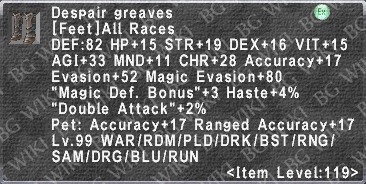
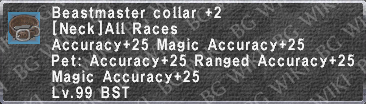
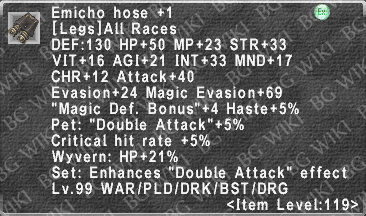
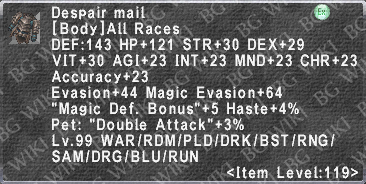
There are a few really good options early on for BST to get started. Looking at a few pieces from the Despair Armor Set, Emicho Armor Set, Valorous Armor Set and Taeon Attire Set. Taeon and Valerous can be frustrating or just a lot of days to get so you do want to mix and match. From the Emicho set, the entire thing is strong but you may have to choose what you get and what you find from elsewhere. The Despair legs and feet would be very serviceable for a while. Taeon and Valorous can be made into whichever you wanted and many of the Valorous can eventually be augmented with strong enough stats to take over most of your pet based sets.
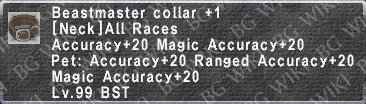
Call Beast/Bestial Loyalty
This set is the precast for Call Beast and Bestial Loyalty. There are 3 things working in this set, the gloves, the recast reduction and the main hand weapon.
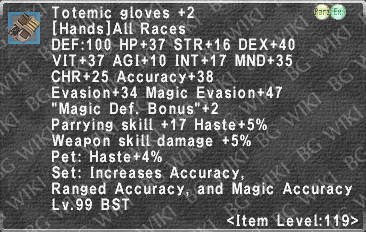
The gloves do give "Call Beast"+2 but this only matters for jug pets below level 99. Its the augment to Beast Affinity you want on these. With full merits it allows us to raise a jug pets level by 15 levels when we call our pet. This makes a lot more jugs viable to us.
The recast reduction is to have the ability back as soon as we can. You could use your Merit Points in this category but often it isn't the best option.
The main hand axe is very important when calling your pets. You can NOT call a pet above the level of your main hand weapon. This means calling a pet with a level 99 axe, with full Beast Affinity merits and the gloves, will still only call a level 99 pet. It doesn't matter which particular weapon you use. It just has to be iLVL 119.
|


Reward
From the Pet Food page,
The Reward formula is:
Total = floor(Base×Potency)
Reward Potency caps at 50% similar to cures.
The Base is another formula:
Base = floor( (MND-Start MND)×Rate÷256 ) + Const
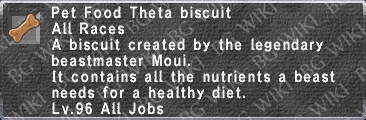
Each pet food effect multiple parts of the equation but Pet Food Theta Biscuit will always be the strongest option. This means we can use the numbers from this pet food to determine how much HP our pet will get back.
- Currently trying to figure out which line of the chart to use for Pet Food Theta**
|


Ready
Ready and Sic force your pet to use one of their moves. Sic is rarely seen these days as it is only used when you have a Charmed pet. It forces a random move as soon as the pet reaches 1000 TP. If the pet can cast spells and is under 1000 TP, it will cast a random spell from its pool of options.
On the other hand, Ready is used with jug pets and you choose the move used. It operated with 3 charges that share a combined timer. Each charge will take 30 seconds to recharge for a total of 1 min 30 sec if you have used all 3 charges. This can be reduced and will be discussed in a moment.
When Ready is used, if your pet does not have 1000 TP, it will be bumped up to 1000 TP so it can use the move it was instructed to use. There is equipment to modify how much TP the move begins with similar to TP offhand weapons. Fencer will also effect any WAR pet at their level. Just remember that the trait's highest level is V at WAR lvl 97. The rest comes from gear which your pets will not have. This trait will grant your pet a bonus 500 TP and 10% Crit. Rate. The moves can include physical damage, magical damage, debuffs and buffs for the pet and master.
At some point, you will have to decide if you want to be the BST that does the damage or just a BST that gets the effects. I wouldn't call a BST going strictly for effects a lesser BST but they are often leaving some damage off the table. However, that damage will not break the game but the number of needed sets may break your wardrobes!
It is perfectly viable to focus entirely on Pet: Accuracy and Pet: Magic Accuracy sets. Just remember the TP Bonus and Ready Recast sets cannot be ignored. If you are going to be an Odyssey only BST, you don't actually need The Pet Physical sets. However, know you make me sad and your choices probably have lead to a large number of puppy deaths so SHAME ON YOU!
Ready Recast
This is the precast set for Ready. Meaning you want this on as you initiate the command to your pet then switch out before the move actually happens. Ready Recast is 30 seconds per charge or 90 seconds total. It is important to reduce as low as possible and the lowest delay you can get it 10 seconds a charge or 30 seconds total. Some of our expected functions are not possible without this recast reduction. Mainly, the need to be able to TP Drainkiss every 30 seconds. For this reason, you want to merit Call Beast Reduction to 5/5 for a 10 second reduction. Then you have 10 seconds more to make up. You can get another 5 seconds from hitting the Job Gift at 100 Job Points.
|

Ready Physical
These are the physical moves your pet will use. Things like Tegmina Buffet from Bouncing Bertha. Often we focus on the damage output of these moves but we also need these to land. As a newer player you will likely push for a very solid physical attack set since that will be the bread and butter for cleaving merit points. However, you will eventually want to decide if you wish to continue holding the gear for sets like physical/magical damage or if you just want to focus on the acc sets. The most important thing is landing the ability. On the physical side, you want the skill chain properties. The damage shouldn’t be ignored but in reality, you can get by with opening the Skillchain. This significantly cuts the amount of gear in your wardrobes. Dropping essentially 2-3 sets needed. You are cutting into dps for this trade off and giving up things like cleaving. Personally, I want the inventory space but I have a need to push to see what all I can do with this job. I keep the damage gear on me.


Ready Multi Hit
Things such as Sweeping Gouge and Tickling Tendrils. Multi hit ready moves replicate ftp.
|
Ready Magical
These sets are used to deal magic damage. Corrosive Ooze is an excellent candidate as there is no accuracy check. Otherwise, you are looking at things such as Fireball, Cursed Sphere and Pestilent Plume.
|


Ready Magic Accuracy
When you just need something magical to land. These days Purulent Ooze is the big one. Otherwise can be used to land on difficult mobs.
|


Ready Buff
These sets are for pet buffs. The higher the TP used, the longer the buff. This is also what you would be using for your TP Drainkiss set.
|
Master Sets
TP
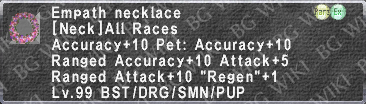
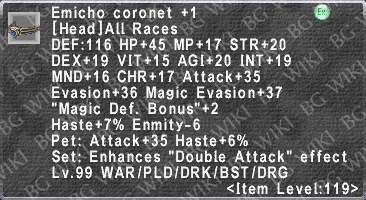
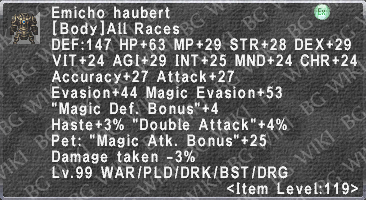
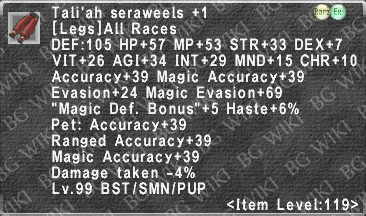
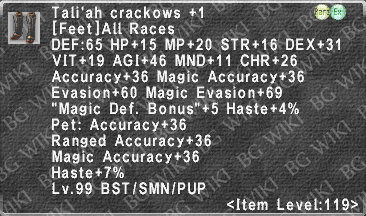
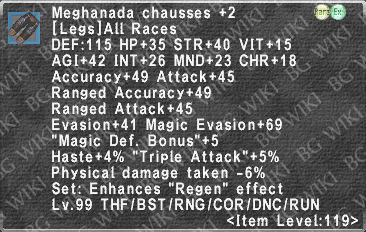
Early on, your TP body, hands, legs are fairly set in stone. You do really want your Tali'ah Manteel +1 for the triple attack. The Meg. Chausses +1 for the triple attack. The Emicho Gauntlets for the STP and Dual Wield. Obviously the upgraded versions are better.
Of the big pieces, this leave the head and feet open. We have the option of filling those slots with the augmented gear. There are some other options but I want to explain these now so I don’t have to in the sets each time.
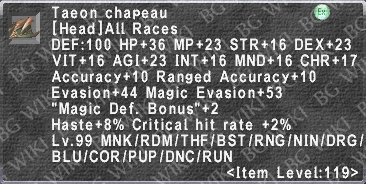
For the head we have the options of the:
- Taeon Chapeau
- Comes with dex+23, Acc+10, haste+8
 acc+20-25, dex+10, triple stack +2 or double attack +5
- Acro Helm
- Comes with dex+18, haste+7, STP+3
- acc+20-25, dex+10, double attack +3 or STP+6
- Valorous Mask
- Comes with dex+24, acc+13, haste+7
- acc+1-40, dex+1-10(Fern:15), double attack +1-4(Fern:5), STP +1-7(Fern:8)
- Augments are fully random and harder to choose compared to the Alluvion Skirmish sets.
For the feet options we have:
- Taeon Boots
- Comes with dex +22, acc+7, haste +4, dual wield +4
- acc+20-25, dex+10, triple stack +2 or double attack +5
- can be an excellent way to add needed DW as you can augment with Dual Wield+5 for a total of 9.
- Acro Leggings
- Comes with dex+15, acc+7, haste+3, double attack +2
- acc+20-25, dex+10, double attack +3 or STP+6
- Valorous Greaves
- Comes with dex+20, acc+12, haste +3, STP+5
- acc+1-40, dex+1-10(Fern:15), double attack +1-4(Fern:5), STP +1-7(Fern:8)
- Augments are fully random and harder to choose compared to the Alluvion Skirmish sets.
Any of these can work in the slots. It comes down to what is available to you at the time and if you are able to get the stones to augment them. For this reason, I’m going to try to avoid them in the beginner sets. Just note that these are options.
Single Wield
|


Let's talk DT sets! You always want an option to bring in DT when things get scary. Buff being inconsistent in dyna? That NIN prob gunna go boom? You want to survive and having a way to bring in a defensive set will save you often. Then we have fights in Sheol Gaol where so many NMs are super dangerous or call adds that can mop the floor with you.
We want to have PDT-50 and MDT-21 with Shell V to cap. You can do sets that gear more towards 1 type of damage or another. You can bring in Warder's Charm and Shadow Ring to eat some magic damage. There are a bunch of options and sometimes you build a set specific to a fight you are doing. Keep options open and remember that it doesn't matter how much STP your set has or how much Multihit if you are face down in the dirt. It is perfectly valid to do 5/5 Nyame and just outlast the fight if that's what it takes to get the win.
Some of our top options for bringing in DT
- Defending Ring
- DT-10
- Gelatinous Ring +1
- PDT-7, MDT+1, R:15 Vit+15, HP+100
- PDT-7, MDT+1,
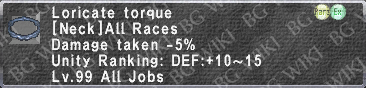
- Loricate Torque +1
- DT-6
- is very easy to do. Anyone who does Sheol C will have Wings they will probably give away.
- Odnowa Earring +1 R:15
- MDT-2 DT-3
- This is a great hybrid TP piece ones R:15. It has DT, Def and Acc
- MDT-2
- Nyame Armor Set
- The set is amazingly defensive and the typical Path B starts getting some Double Attack at 16.
- Malignance Attire Set
- Amazing hybrid set. Just note that all STP and no Multihit doesn't feel great.
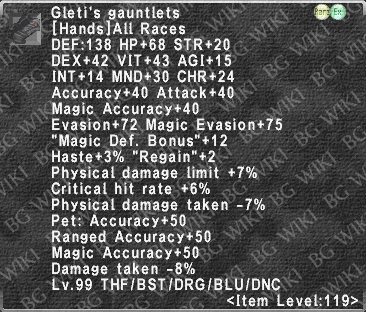
- Gleti's Armor Set
- Very defensive set but only PDT. Makes up for it with large MDB. Body gets DA+5 by R:15. Rest needs more rp to do more than just be defensive.
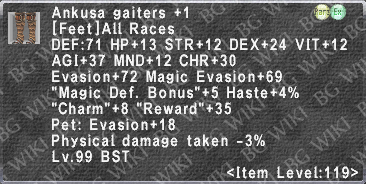
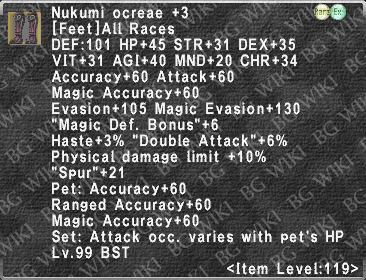
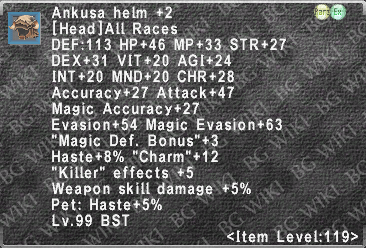
- Nukumi Cabasset +2/3
- DT-10/11. No real TP stats.
- Nukumi Manoplas +2/3
- DT-10/11. No real TP stats.
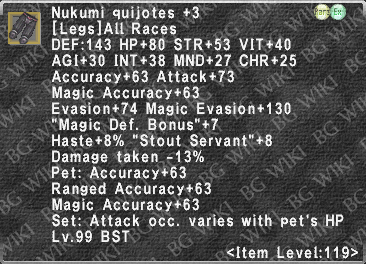
- Nukumi Quijotes +2/3
- DT-12/13. “Stout Servant”+6/8. No real TP stats.
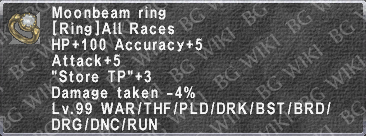
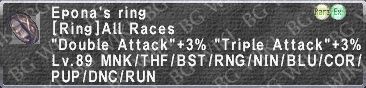
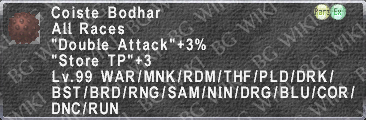
- Moonbeam Ring/Moonlight Ring
- DT-4/5. The added STP and Acc makes these excellent in hybrid tp sets.
- Flume Belt/+1
- Both are PDT-4
- Platinum Moogle Belt
- DT-3, HP+10%, Meva+15
Other defensive options
- Warder's Charm +1
- Many resistances. Occasionally absorbs magic damage taken.
- Shadow Ring
- Occasionally annuls magic damage taken.
- These 2 are often combined to eat magic damage.
- Occasionally annuls magic damage taken.
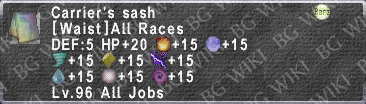
- Carrier's Sash
- +15 resistances to all elements.
- Engraved Belt
- +20 resistances to all elements, Acc/Atk+10
- Nukumi Gausape +2/Nukumi Gausape +3
- With Killer Instinct up and the correct monster correlation, you get Intimidate procs and Special DT-5%
|

Dual Wield
You get access to Dual Wield via the Dancer and Ninja subjobs. The Attack Speed page will describe this better than I can. The main takeaway is that lowering your attack delay is fantastic but overloading DW will hurt your tp gain. If you follow the chart and try to be within 1-2, you will be fine. Ideally you hit the number exactly but sometimes, it's just not gunna happen with the gear available.
Again, we want to remember that defence matters and we would want DT gear in the sets where we can or at least an option to bring some in when things get dangerous.
To make your own DW sets, you can just figure out how much you need and use the available options to make it work. Don't go too crazy at first trying to make all the tiers because the options available early on make it difficult. Early on, just try to have enough DW for capped magic haste. The moving target on /DNC can make it difficult but it's something you can work towards. As you get more established and options open up, you can do capped magic haste, Haste II, Haste and no Haste tiers. /DNC would want those with/without Haste Samba.
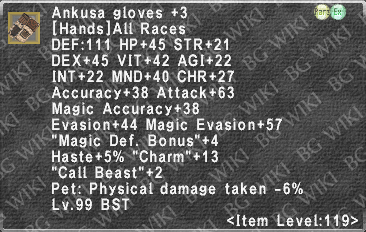
- Emicho Gauntlets - Path:D DW+5 - great for new players but will want to upgrade eventually
- Emicho Gauntlets +1 - Path:D DW+6 - - Go to for 6
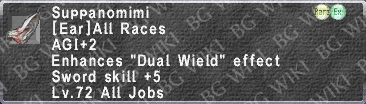
- Suppanomimi - DW+5 - - Go to for 5
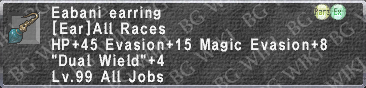
- Eabani Earring - DW+4 - - Go to for 4
- Patentia Sash - DW+5
- Shetal Stone - DW+6
- Reiki Yotai - DW+7 - usually out of reach of newer players - Go to for 7
- Nusku's Sash - DW+5
- Gerdr Belt +1 - DW+4 - ridiculously expensive
- Gerdr Belt - DW+3 - ridiculously expensive
- Valorous Armor Set - DW+5 can be put on any piece
- Taeon Attire Set - DW+5 can be put on any piece
- Taeon Boots - DW+4 DW+5 for a total of DW+9 - Go to for 9
- Artio's Mantle - DW+10 - Go to for 10
You can exchange any piece for equal value in the sets as you wish. Some will create better sets than others but availability to the player has to be taken into account.
|

Weapon Skills
Different weapon skills need different abilities to make them shine. Generally speaking, single hit WS will want Weapon Skill Damage (WSD) while multihit WS will want things like double/triple attack. All physical WS will want more Attack to push you to positive returns of the PDIF function of the damage formula. Magical Weapon Skills are single hit so would want things like WSD and Magic Atk. Bonus. Some WS have fTP values that scale well with having more fTP. These mean having extra TP allows it to hit much harder. The poster boy for this is Savage Blade which typically gets fired off at 2k TP. You can get the Moonshade Earring and select the version with TP Bonus +250. You get access to Fernagu which can be made to have TP Bonus +1000 which means that your Savage Blades can be used at 1k tp while using the fTP scaling from 2k.
|


Single Hit
Savage Blade, Mistral Axe and Calamity. Still needs to add reward ring options
|


Multi Hit
Decimation, Ruinator and Rampage.
Decimation and Ruinator can share a set.
Rampage is a little different because it can crit. This means things like crit damage are great additions. Unfortunatly, we haven't seeing any great crit damage pieces in a while so everything is a bit out dated. The main source would be augments on the Valorous Armor Set which has fallen behind the times. It can be augmented with Critical Damage+5% while also getting STR and Attack as other options. Good luck getting it to line up. Meanwhile, between Gleti's and Nukumi, it's hard to justify grinding for them.
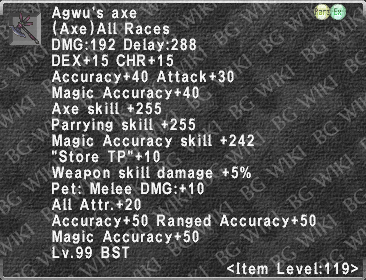
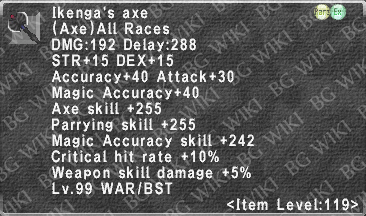
The other thing to discuss is the offhand options. Both Agwu's Axe and Ikenga's Axe are fantastic options. Agwu's is better for things coming off the pet and better for the TP phase. Ikenga's has the crit rate which helps with more damage during the TP phase and is a clear winner with Rampage. As more RP goes on the axes, Agwu's gets Skill Chain Damage and Ikenga's gets TP Bonus. Decide what you need and select the correct offhand.
For the main hand, Dolichenus is the clear winner if the focus is Decimation or closing skill chain's. For Rampage, you are probably looking towards Doli or Aymur for the TP gain.
|


Magic Weapon Skills
Primal Rend and Cloudsplitter.
The sets are very similar. Primal Rend has modifiers of DEX 30% CHR 60% while Cloudsplitter is STR 40% MND 40%. This can come into play if you want to make a beginners set and can be used to find alternatives to mid tier sets. However, the sets are basically the exact same in the end. Nyame and MAB. The big difference being their elements. Cloudsplitter being ![]() which doesn't have anything to help it's specific element. Primal Rend is
which doesn't have anything to help it's specific element. Primal Rend is ![]() based and has the Weatherspoon Ring +1 but only if that was your choice at the end of Adolin.
based and has the Weatherspoon Ring +1 but only if that was your choice at the end of Adolin.
Both can make use of Hachirin-no-Obi under the correct day/weather.
The other thing to discuss is the offhand options. Fernagu is a fantastic option as both WS scale well with TP. Then we are back to the previous options of Agwu's Axe and Ikenga's Axe. Again, Agwu's is better for things coming off the pet and better for the TP phase. Ikenga's crit rate helps with more damage during the TP phase and this matters if you are running Cloudsplitter with Farsha and can make use of the Empyrean Aftermath. The RP on Ikenga's will continue to improve the situation and make it a far better option over Fernagu when paired with Farsha. Before RP, it kind of depends on what you are trying to do. If you are trying to make full use of the aftermath, Ikenga's is the ticket. If you are just rocking Cloudsplitter, use Fernagu.
|