Forum Discussion
Feel free to ask questions about Rune Fencer or the guide in the Forum Discussion.
Food & Medicines
Food
Recommended:
 Miso Ramen
- Stats: HP+100, STR+5, VIT+5, DEF+10% (Max. 170), "Magic Def. Bonus"+5, Magic Evasion +10% (Max. 50),"Resist Slow" +10.
- The best defensive tanking food there is. It couples HP+, Defense, and Magic Evasion+ all into one food.
- Purchased from the Auction House. Crafted only.
 Om. Sandwich
- Stats: HP+11% (Max. 150), VIT+7, MND+7, Accuracy+11% (Max. 80), DEF+11% (Max. 120), Enmity+4.
- Introduced in The Voracious Resurgence missionline. Comparable to Miso Ramen in HP and Defense; exchanging Magic Evasion and Magic Defense Bonus for Accuracy and Enmity.
- Purchased from the Auction House. Crafted only.
Alternatives:
 Black Curry Bun
- Stats: (DEX+2, VIT+4, INT+1, Accuracy+5, Ranged Accuracy+5, Evasion+5, DEF+15% (Max. 180), "Resist Sleep"+3, HP recovered while healing +2, MP recovered while healing +1)
- The next best thing. This food actually has 10 more defense than Miso Ramen, but lacks the other benefits. The silver lining is that they are a fourth to a fifth the price of Miso depending on the market.
- Purchased from the Curio Moogle for 4,000 gil, 48,000 a stack.
 Tavnazian Taco
- Stats: (HP+20, MP+20, DEX+4, VIT+6, AGI+4, CHR+4, DEF+25% (Max. 150), HP and MP recovered while healing +1)
- The once famous food. There is no reason to really use this anymore, but if you are a lower level it will grant more defense than one of these higher level items given its lower cap, but higher percentage increase.
- Purchased from the Curio Moogle for 4,000 gil, 48,000 a stack.
 Rabbit Pie
- Stats: (STR+5 VIT+5 INT-2 Attack+25% (Max. 100) Ranged Attack+25% (Max. 100) DEF+25% (Max. 100))
- An honorable mention. The attack and defense parameters aren't as high given it's hybrid status but definitely worth looking at.
- Purchased from Curio Moogle for 3,000 gil, 36,000 gil a stack.
 Fried Popoto
- Stats: (HP +30, VIT +2,
 +20, Defense +20% (Cap:145), Subtle Blow +8)
- This food is as cheap as it gets, excluding the crystal it costs less than 300 gil to make 6 of these a synth. Making these in bulk to store and use for Ambuscade spam and similar events will cost you next to nothing. Even if you have to shout and pay a level 90+ cook 50-100k to make them for you. It would still only cost you roughly 10-20k a stack of Fried Popotos.
- Purchased from the Auction House, crafted only.
Medicines
 Echo Drops
- Useful for when silenced and no one else can (or is able to) Silena you. Keep these stocked.
 Remedy
- Useful for curing most debuffs curable with -na spells (ie: Paralyna). You can receive 12 a month for free from ambuscade. Keep these stocked.
 Reraiser /
  Hi-Reraiser
- Nothing wrong with keeping extra sources of Reraise in your pocket. Keep these stocked.
 Holy Water
- Extremely useful to have, especially when spell priority or universal cool downs from back=line supports are bottle necked... Keep them stocked.
 Panacea
- Sometimes you are overwhelmed with a number of debuffs (like an Impact) that need Erase and this is much faster than waiting on a support to erase them. Keep these stocked.
 Vile Elixir /
  Vile Elixir +1
- You never know when these might come in handy. Even for other party members... Great for putting in a bazaar for back-line supports when in a pinch as well! A single Vile Elixir or HQ can save you in those situations. Keep these stocked.
- Purchased from the Curio Moogle; 20,000 Gil for NQ. 40.000 Gil for HQ.
- Often cheaper to buy off the Auction House.
- A number of NM's and various content drop these for free as well.
 Antacid
- Great for switching food on the fly when the situation calls for it. Keep a few, just in case.
 El. Pachira Fruit
- Effect: 1hp/tick Poison Effect for 2 minutes.
- Perhaps you aren't engaged and can't swap to a particular piece of equipment with a damage over time effect. Poisoning yourself is a good option. Keeps you awake when you know the mobs you are fighting will spam sleep. Keep a few on hand.
Roles
Hybrid Tank with emphasis on magic damage mitigation.
Support Jobs
|
 Dark Knight Dark Knight
- A Dark Knight serves as one of two of the most common sub jobs for Rune Fencer. As a more offensively oriented sub job, a RUN/DRK has the potential to increase it's damage output through the use of abilities and traits it gains. The tanking strategy for this set up is to establish hate with Poisonga and then rotate Foil, Stun, Flash to maintain hate on the threats.
- Abilities: Arcane Circle, Last Resort, Weapon Bash
- Traits: Smite II, Resist Paralyze II, Desperate Blows II, Attack Bonus III & Resist Paralyze III (ML5), Smite III & Damage Limit III (ML30)
- Spells: Stun, Poisonga, Aspir
|
 Blue Mage Blue Mage
- Using Blue Mage as a sub job is commonly seen with Paladin, but for beginning Rune Fencers, this is a common tactic. While your use of spells and traits will vary based on the spells you set, the most common spells set are Healing Breeze, Sheep Song, Wild Carrot, Terror Touch, Grand Slam, Cocoon, Jettatura, and Blank Gaze.
- Abilities: No noteworthy abilities
- Traits: Varies
- Spells: Varies
|
|
 Samurai Samurai
- A fairly uncommon subjob, this sub job is more common for soloing where a Rune Fencer is either opening or soloing Skill Chains in parties such as CP or Odyssey were a true tank is not needed.
- Abilities: Warding Circle, Hasso, Third Eye, Meditate, Sekkanoki
- Traits: Store TP II, Zanshin II, Resist Blind III, Store Tp III & Zanshin III (ML5)
|
 Ninja Ninja
- While boosting an impressive amount of skills to add to your kit when soloing, using Ninja for a subjob provides little to a Rune Fencer. Commonly the purpose for this use is for Ambuscade fights or Master Trails. The lack of skill in Ninjutsu means that holding hate will become reliant mostly on Rune Fencer's Capabilities. Not to mention Elemental Ninjutsu will not be of use effective in endgame content.
- Traits: Dual Wield III, Subtle Blow III
- Buffing Ninjutsu: Tonko: Ichi/Ni, Utsusemi: Ichi/Ni,
- Enfeebling Ninjutsu: Kurayami: Ichi/Ni, Hojo: Ichi/Ni, Dokumori: Ichi, Jubaku: Ichi
- Elemental Ninjutsu: Katon: Ichi/Ni, Suiton: Ichi/Ni, Raiton: Ichi/Ni, Doton: Ichi/Ni, Huton: Ichi/Ni, Hyoton: Ichi/Ni
|
Tanking: Mitigation & Enmity
- A Rune Fencer's job of tanking can be split into two [simplified] schools of thought: 1) Mitigating incoming damage and negative status effects through defensive measures; and 2) Maintaining a high(er) level of enmity over other party and/or alliance members. Please see below.
Layering Defenses
- Ah Defense. As mentioned above, the key to mitigating damage and negative statuses is through layering defenses against them.
- On the physical side for Rune Fencer, it starts with the most basic of stats of Vitality and Physical Defense. Further enhanced by stats such as Physical Damage Taken -% (PDT-%) gear and its more advanced form Damage Taken -% (DT-%) gear. Rune Fencer also specializes in Parrying which completely negates damage when facing an attacking monster while engaged. There are various spells and abilities which augment physical defenses such as Protect, Phalanx, and Battuta.
- On the magical side for Rune Fencer, it starts with the the stats of Intelligence, Mind, Magic Defense and Magic Evasion. Further enhanced by magic damage taken -% (MDT-%) gear and its more advanced form Damage Taken -% gear (which covers bother Physical and Magical damage, but also the less often seen Breathe damage). There are various spells and abilities which augment magical defenses such as Shell (which is itself a form of MDT-%) and One For All for example.
Enmity
- Enmity itself can be divided into two specific measurable types: Cumulative Enmity and Volatile Enmity.
- Cumulative Enmity is largely static and typically builds slower than its counterpart. Cumulative Enmity is reduced by outside actions such as taking damage and getting debuffed (negative status effects).
- Volatile Enmity is more fluid in that it builds quickly--typically (but not always) at a rate of three times that of Cumulative Enmity. Volatile Enmity however, natively reduces overtime. Approximately 60 Volatile Enmity per second.
- Please see Enmity Table section below for the measurable caps on both types of enmity.
- Enmity in general can be split across three categories: Curing, Damage, and Actions. The first two are fairly self-explanatory but here is a direct link for further explanation: Damage and Cure Enmity Gain. Please see below for Actions.
- Virtually every player action in the game generates enmity. Although most don't do much, "enmity actions" would be actions with notable enmity value(s) attached. (Such as Flash or Provoke)
- Enmity also has a general range limit. Which should be kept in mind for tanking purposes, such as when kiting a mob.
- The maximum range for registering a Spell or Ability's Enmity with/against a given foe is 25 yalms.
Enmity Table
- The cap enmity is 60,000 total (30,000 each of Cumulative (CE) and Volatile Enmity (VE)).
- If multiple players have enmity on a monster (on the hate list), the monster will target the player on the hate list with the highest combined enmity values.
- In the case of multiple players having identical enmity values (being at enmity cap for example), a monster will target the player that acted most recently.
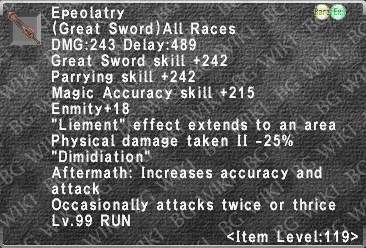
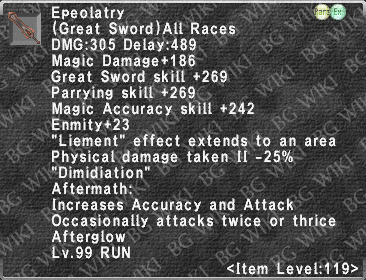
- With Rune Fencer's Ergon Weapon Epeolatry equipped, Liement's effect is augmented to an Area of Effect of 10 yalms. The Enmity Values are multiplied per party member hit with the effect.
Notes on Tanking /BLU
Blue Mage as a sub (or support job) has been very effective for quite some time now. "/BLU" provides a number of benefits both directly and indirectly to help bolster the player's defenses and Enmity gain & retention. Those familiar with setting their Blue Magic spell list may already know this but it's worth mentioning that you only are able to set 14 spells or a total of 30 points (whichever comes first) as a Level 49 /BLU. With Master Levels allowing access to Blue Magic spells from Levels 50~59, at Master level 10, those caps increase to 16 spells and 35 set points, respectively.
See below for a list of spells to think about setting:
- Direct Uses
- Cocoon: Increases Physical Defense rating by 50%.
- Bomb Toss and Cursed Sphere are both Medium Range (13.5 Yalm distance) spells for multi-target Area of Effect pulls (7 Yalm Radius).
- Blank Gaze: Single-target Enmity spell.
- Jettatura: Front conal Enmity Spell (9 Yalm range, 30~45° cone).
- Caster-Focused Area of Effect Enmity Spells: As the bullet point indicates, /BLU has a variety of AoE spells focused around the caster which can be used to either tag a group of mobs or bolster the Enmity already established on a group of enemies.
- Sheep Song, Stinking Gas, Soporific, and Geist Wall.
- Please Note: There is a 15 target maximum initial Enmity establishing limit. So for example, if there is a group of 20 monsters and you cast an AoE Enmity spell covering all 20, only 15 will add you to their Enmity List. Anything past that limit has to be either tagged individually one at a time or AoE'd outside of that initial 15 targets.
- Stat Gains
Yes, stat gains. Even with the amount of stats given by Item Level equipment, you still will have some spell slots left over to add additional stats according to your own personal preferences. In this case, listing spells which add a few extra points of HP as it's objectively the most reasonable gain one can get out of the list and may push you over a HP threshold:
- Direct Uses
- Caster-Focused Area of Effect Enmity Spells:
- Cold Wave: Becomes an additional option in your rotation after ML 15 and even has a minor added benefit of applying a Frost DoT.
- Job Traits
- Stat Gains
/BLU Enmity Table
Picking your Spells
Brahmsz (talk): This is more of a personal notation, but your set list of spells while limited in capacity by sub is a still a matter of personal preference. All the spells listed here should have their respective links but in an abundance of caution for those who will likely skip over these sorts of things here's some tips:
- MP Cost, Casting time, Casting & AoE Range, and Stat Gains (HP) are all considerations for what spells you choose.
- Personally, I lean more into a spell set that favors HP gains to push my HP cap over a given threshold, for example.
- As such, I avoid Soporific & Geist Wall as they both have HP-10, for example.
- Of the 4 non-Master Level AoE spells available, Sheep Song has the lowest MP Cost (22MP), followed in order by Soporific (24MP), Stinking Gas (44MP), and Geist Wall (46MP).
- Stinking Gas has the longest casting time at 4 seconds compared to 3 seconds for the others.
- Geist Wall has the shortest recast time (30 sec), followed by Stinking Gas (37s), Sheep Song (60s), and Soporific (90s).
- Cursed Sphere has a lower MP Cost (32v42), Cast Time (3v4), and Recast (20v25) over Bomb Toss while having the same Casting & AoE Range.
Job Traits and Abilities
|
|
|
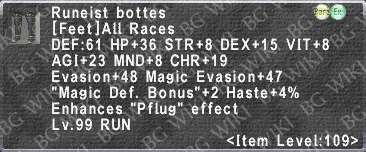
Note:  Runeist Bottes enhancement is applied during the status resist check rather than on JA activation. Runeist Bottes enhancement is applied during the status resist check rather than on JA activation.
|
Merits
| ExpandGroup 1
|
| Name
|
Description
|
Level
|
Notes
|
| Rune Enhancement Effect
|
Increase potency of runes harbored by 2 points.
|
5/5
|
This is nice, and provides up to 10 magic evasion per rune. Only alternative would be Pflug.
|
| Vallation Effect
|
Add elemental damage reduction to Vallation and Valiance of 1 point per rune.
|
5/5
|
Not optional.
Increases the elemental damage reduction of the JAs from 15% to 20% per rune.
This is not counted as MDT and is multiplicative with and thus passes the MDT cap for those elements though.
This is similar to Barrier Tusk, and the potency over DT cap.
Given that you may AoE this to your party. This is a crucial category for fulfilling your role as a magic reduction tank.
|
| Lunge Effect
|
Increase the accuracy of Lunge/Swipe by 3 per rune.
|
0/5
|
Hey look ma', garbage!
|
| Pflug Effect
|
Enhance the likelihood of resisting opposing rune elements by 1%
|
0/5
|
If it weren't for the fact that resistance is halved against NMs (so +2% at 5/5, woah!) and the Runeist's Bottes +3 needing to be equipped while the ability is on, then this would be a nicer option.
The best way to use this would be against an enemy like Arebati V15. Where Amnesia and Encumbrance, which are both fire based enfeebles, are plaguing your existence, but are a different element than the runes you need to run to not get destroyed by Blizzard VI and ice based TP moves. You may use Unda x3 and Pflug then go back to Ignis runes and evade some of the Amnesia and Encumbrance.
However, you are probably much better off just running a barfire/baramnesia to combat those effects (despite the dispelling..) and running 3 ignis full time to nerf any damage and hate loss. So, lets go Rune Enhancement 5/5.
This is not bad, but its "so SE".
|
| Gambit Recast
|
Shorten recast time by 10 seconds.
|
0/5
|
No.
|
| ExpandGroup 2
|
| Name
|
Description
|
Level
|
Notes
|
| Battuta
|
Parry +4% per level. We don't care about counter-spike damage.
|
4/5 or 5/5
|
Inquartata is your best way of mitigating physical damage for overall tanking.
Battuta not only protects you from hordes of well positioned foes spitting on your face, but also allows you to situationally take risks in the name of DPS by more safely wearing offensive sets while gaining TP from Tactical Parry and going shall we say, apeshit. Such a situation is most common in something like Ambuscade, but it sure feels good.
|
| Rayke
|
Expends runes to reduce the resistance (SDT) of a target.
|
1/5
|
This is something which I historically had at 5/5 when BLM MBing was the way many moons ago. It also helps dramatically with SC damage, and landing debuffs (see SDT page and resistance tiers) despite its short duration of 33-45 seconds. Rayke also works as a last resort for grabbing enmity after a hate reset. This ability is one of the best magical niches RUN can fulfil. Use it after throwing on Gambit as it lasts twice as long (like this should!).
|
| Inspiration
|
Grants a Fast Cast effect to Vallation and Valiance, 10% per level.
|
4/5 or 5/5
|
This may sound underwhelming at first, but a Paladin would give their left ovary to have this.
The real benefit isn't obvious at first to some, but being able to reduce your FC by 60% (with Futhark Trousers) allows for more DT, Enmity, HP, and survivability. Dying midcast is probably going to be your most likely event over time, and this helps prevent that.
Properly gearing around this is critical in being all the RUN you can be.
Alternatively, if you needed points, RUN gets enough FC (~70% out of 80% cap) to run this at 1/5.
This 10%/tier FC bonus also applies to your party during Valiance, so be the guy.
|
| Sleight of Sword
|
Grants a "Subtle Blow" effect during Swordplay.
|
0/5
|
This is really only useful for niche situations such as Sealed Fate strategies, but it does have a use.
|
Equipment
Sets by Brahmsz
Preliminary Information
- Inputting base HP values of each race for reference herein. Non-mastered; 15/15 HP Merits assumed.
- Tarutaru: 2,043 HP
- Mithra: 2,073 HP
- Hume: 2,073 HP
- Elvaan: 2,113 HP
- Galka: 2,173 HP
- Master Level HP per Level: +7.
- Support Job Level increase (per 5 Master Levels) not factored into this.
- Notable Master Level HP Values:
- ML15. HP +105
- ML29. HP +203
- ML36. HP +252 HP
- ML43. HP +301 HP
- ML50. HP +350 HP
New Players Sets
Foreword
- When it comes to Rune Fencer, I find it to be a slightly difficult task to tell people "Where to start". As content has been introduced over the years and as The Meta™ has changed, so have entry sets.
- What I can advocate for, and still stick to however, is that Rune Fencer's Artifact, Relic, and Empyrean armors remain at the core of their sets (from Entry Level to High-End). So collect those first and foremost!
- Some accessory examples to consider (if you don't have them of course) are Defending Ring, Loricate Torque, Odnowa Earring & Tuisto Earring, and Staunch Tathlum for defensive purposes.
Equipment Sets: Work in Progress.
| Entry Tank Set 1
|
ExpandNotes:
This set is, in my honest opinion, the bare minimum of tanking content without feeling underwhelmed.
|
|
High-End Endgame Sets
- You may notice that Defending Ring changes slots based on the set. While this may not seem like a glaring error it would bad not to point this out. Personally, I use Vocane Ring +1 as well as Ragelise's Ring and officially retired my Defending Ring as of this year (2024). Not a choice I would ask anyone else to make but for the sake of being transparent, there it is.
- Additionally, I don't use Gelatinous Ring +1 either...
- My approach has always been to cap or at least get as close as possible to capping the Damage Taken-% stat. Not a fan of the "You only need MDT-21% approach" to gearing. It makes gearing a bit easier in some respects though. As always, "Your Mileage May Vary" & "Sh*t's Situational."
| High-End Tanking Set III
|
ExpandNotes:
Note this set uses an Aettir. Yes, it's still useful even at High-End. I also use a Nibiru Faussar to get as close to capping Cure/Cure Received while sub SCH. An augmented Ushenzi +1 is also a notable alternative.
|
|
| High-End Tanking Set IVB
|
|
|
Phy. Def. &
Crit. Hitrate-%
|
|
|
|
|
Magic Casting Sets
Endgame Tanking Sets By Kingkitt
Last updated January 2022 by Kingkitt.
|
|
|
|
PDT II -25%, PDT-16%
MDT -2%
DT -35%
632 M.Eva. +
Resist All Elements +39
|
|
|
|
|
|
|
|
|
PDT II -25%, PDT-7%
MDT -2%
DT -47%, 677 M.Eva.
|
|
|
|
|
|
|
|
PDT -37%, DT -12%
413 M.Eva.
|
|
|
Notes:
- Can play with hybrid set as much as you want based on gear/augments to fit your specific needs.
|
|
|
|
|
MDT -9%
DT -50%, 801 M.Eva.
+36 Resist Stat. Ailments
|
|
|
|
}}
Sets by Epic
Last updated June 2024 by Epicgalka.
These are the sets I most commonly use
|
|
ExpandNotes:
- Can use JSE Neck+2 and JSE Earring +1/+2.
|
|
Utility Sets
- Alternatives Taeon+3 until dark matter Herc
Gearswaps

 Miso Ramen
 Om. Sandwich
 Black Curry Bun
 Tavnazian Taco
 Rabbit Pie
 Fried Popoto
 +20, Defense +20% (Cap:145), Subtle Blow +8)
 Echo Drops
 Remedy
 Reraiser /
  Hi-Reraiser
 Holy Water
 Panacea
 Vile Elixir /
  Vile Elixir +1
 Antacid
 El. Pachira Fruit