The Voracious Resurgence | |
| Prime Weapons • Ultimate Weapons • Ultimate Augments • Abjurations iL119 • JSE Necks • Divergence Augments • Escutcheons | |
| Reforged Armor Artifact: +1 • iL109 • iL119/+2/+3 Relic: +1/+2 • iL109 • iL119/+2/+3 Empyrean: +1/+2 • iL109 • iL119/+2/+3 |
Guides • Crafting • Trusts • Apex Monsters |
Dragoon Guide By Kaius
|
|
Introduction
Dragoon is a heavy-ish DD job capable of producing some of the highest damage output in the game in some situations. The job has a fast-paced playstyle due to the arsenal of low cooldown job abilities it comes equipped with. As a Dragoon you also have a best friend / pet wyvern to accompany you throughout Vana'diel. Your wyvern is what drives your damage output by providing you with 20% attack, 20% defense, 10% Job Ability Haste, 10% Weapon Skill Damage, and 15% Double Attack. It is essential that you understand your Wyvern (Dragoon Pet) in order to maintain those benefits and be successful as a Dragoon. For the equipment portion of this guide I will focus on end-game ready options. For Odyssey gear this means I will show Rank 25 options in the sets. It's obviously safe to assume R30 is even better, and usually R20 is almost as good (although there are a few places where R20 is noticeably worse than R25 - such as Gleti's Breeches). Furthermore, I will try to explain what you're looking for in a set and provide some alternatives so that you can have the confidence to mix-and-match as needed, or even experiment on your own.
Support Jobs
There are four main jobs which can all be a viable support job selection for a Dragoon, depending upon the engagement.
- Hasso - Capped equipment haste (25%), capped magic haste (43.75%), and 10% job ability haste from the wyvern puts you at 78.75% haste. Hasso provides an additional 10% job ability haste, pushing us over the 80% total cap (88.75%). That last 1.25% may seem insignificant but it ends up being a big deal because of the nature of haste - "As delay goes 0, dps goes to infinity". Additionally, there may be times where you want to use a gear set with less than 25% haste - Hasso will allow you the flexibility to do so by making up the difference with extra job ability haste - specifically you can shed 8.75% equipment haste (keeping 16.25%) if you maintain magic haste cap, Hasso, and wyvern.
- Store TP - Grants Store TP III which yields +20 STP
- Zanshin - Grants Zanshin III which provides 35% chance to attack again immediately after missing a target.
- Sekkanoki - Limits TP cost of next weapon skill to 1000.
- Warding Circle - Makes you and your party do 5% more damage to, and take 5% less damage from demons.
The primary benefit of /SAM is an increased rate of TP generation via the additional haste received from Hasso, and the additional 20 Store TP. Faster TP leads to more frequent weapon skills and more damage. Importantly, Hasso can be maintained with 100% uptime. This makes it ideal for situations where your damage output needs are constant over a long period - such as Odyssey C where you are basically constantly engaged for 30 minutes.
- Last Resort - A 3 minute duration, 5 minute cooldown buff that gives 25% attack and 15% job ability haste buffs - at the cost of a 25% defense down penalty on yourself.
- Weapon Bash - On demand stun
- Souleater - Some additional auto-attack damage at the cost of self-inflicted damage.
- Arcane Circle - Makes you and your party do 5% more damage to, and take 5% less damage from arcana.
The primary benefit of /DRK is Last Resort which also closes the final 1.25% haste gap, while also providing a huge attack boost. However, it is important to note that Last Resort will not have 100% uptime, and you do not have the additional store tp provided by /SAM. The nature of Last Resort lends itself to situations where you may engage a target in combat for 1-3 minutes and then have a long period without combat before engaging in another battle. (read: Sortie bosses). In this case, Last Resort is always up when you need it and it's cooling down while you run between fights.
- Fencer - +200-300 TP bonus makes Savage Blade (and Judgment) shine.
- Double Attack - Grants Double Attack II which yields +10% double attack.
- Berserk - 25% increased attack with 60% uptime.
- Aggressor - A boost of 25 accuracy, also with 60% uptime. Hopefully not needed, but nice when it is.
- Warcry - A percentage based attack boost for the whole party with 30 second duration. Always welcome buff.
- Provoke - A little enmity utility for emergencies.
The War support job's most important contribution is Fencer. (Fencer I until master level 45, then Fencer II). Fencer provides either +200 or +300 TP bonus and either +3% or +5% crit when single wielding. For better or worse, a Dragoon wielding a Naegling is a force to be reckoned with, and Fencer amplifies this effect. The additional attack provided by Berserk and Warcry are always welcome as well. When properly geared and executed /WAR is exceptionally powerful in Odyssey C as TP can be generated very quickly via jumps, and a single Savage Blade from a DRG/WAR will kill a fodder mob on any floor. Even outside of Odyssey there are certain fights where a Savage Blade only strategy is called for, and DRG/WAR will be very powerful in those situations.
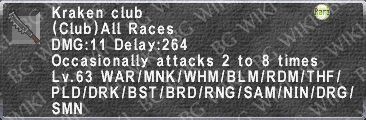
- Dual Wield II - The main attraction here - access to an offhand weapon for Dragoon - typically only used if you have access to a Kraken Club.
- Box Step - Can add a little bit of defense down if no one else is there to apply the same class of debuff for you. More likely you will be killing too quick to need it (eg seg run), or someone else will be applying defense down.
- Curing Waltz III - Some very solid utility. At the rate you generate tp as /DNC with a Kraken Club you can easily afford to use some TP for emergency curing.
- Healing Waltz - Always handy to be able to erase yourself when the healer is occupied, there isn't a healer, and/or you want to save yourself 20,000 gil using a panacea.
- Chocobo Jig - Who doesn't love running a little faster?
- Subtle Blow II - Nice little bonus when you are smacking things with your Kraken Club
The Dancer support job is used primarily by owners of the infamous Kraken Club with the goal of firing off Savage Blade as rapidly as possible. You may wonder about the /NIN option, especially if you have experience with other jobs where /NIN is commonly used for Dual Wield. For those other jobs, one of the main benefits of /NIN is access to Dual Wield III compared to /DNC's Dual Wield II. Jobs like Red Mage and Bard need the extra 10% delay reduction from /NIN to get to a place where they need only 11% Dual Wield on gear to achieve the delay reduction cap of 80%. Dragoon, however, comes with 10% Job Ability haste by virtue of it's Wyvern (Dragoon Pet) which more than makes up for the difference in Dual Wield. Here are two full calculations showing how Dragoon achieves the 80% delay reduction limit with /DNC, assuming maximum magic haste, and gear haste of of 25% or 23%.
- 25% Gear Haste => (1 - 0.15 Dual Wield) × (1024 - 256 Equipment Haste - 448 Magic Haste - 101 Job Ability Haste) ÷ 1024 = 0.1817 [18.2% Delay remaining === 81.8% Delay reduction]
- 23% Gear Haste => (1 - 0.15 Dual Wield) × (1024 - 235 Equipment Haste - 448 Magic Haste - 101 Job Ability Haste) ÷ 1024 = 0.1992 [19.9% Delay remaining === 80.1% Delay reduction]
Accordingly, you only need 23% gear haste and ZERO +Dual Wield on gear to achieve maximum attack speed. In fact, adding dual wield would actually lower your TP gained per swing. For the same reason, /NIN will actually reduce your TP rate compared to /DNC, and should only be used if for some reason you have a critical need to be a dual wielding Dragoon with Utsusemi: Ni.
Merits
| ||||||||||||||||||||||||||||
| ||||||||||||||||||||||||||||
Weapons
![]() Gungnir (Level 119 III) Opens up access to Geirskogul, DRG's only weapon skill with the (Distortion) property. May find niche uses, but will most likely want to prioritize other REMAP options.
Gungnir (Level 119 III) Opens up access to Geirskogul, DRG's only weapon skill with the (Distortion) property. May find niche uses, but will most likely want to prioritize other REMAP options.
![]() Rhongomiant (Level 119 III) A strong option for low-buff situations when you can really take advantage of Camlann's Torment defense ignoring properties.
Rhongomiant (Level 119 III) A strong option for low-buff situations when you can really take advantage of Camlann's Torment defense ignoring properties.
![]() Ryunohige (Level 119 III) Considered to be a high quality option (at or better than Trishula) when sufficiently geared and spamming Drakesbane in a fully buffed zerg situation.
Ryunohige (Level 119 III) Considered to be a high quality option (at or better than Trishula) when sufficiently geared and spamming Drakesbane in a fully buffed zerg situation.
![]() Trishula The bread-and-butter option. Relatively easy to obtain with very high damage potential. Works well either in a party/raid zerg situation or solo self-skillchaining.
Trishula The bread-and-butter option. Relatively easy to obtain with very high damage potential. Works well either in a party/raid zerg situation or solo self-skillchaining.
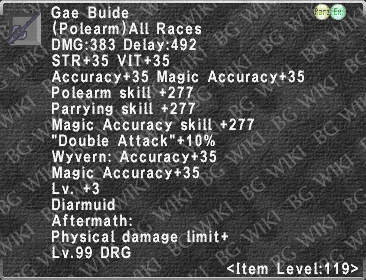
![]() Gae Buide (Level 119 III) The top tier option, but it comes with a very large barrier to entry. If this is your chosen Prime and you do do enough Sortie to support the grind to stage 4 and beyond, then you will be rewarded with an incredible polearm.
Gae Buide (Level 119 III) The top tier option, but it comes with a very large barrier to entry. If this is your chosen Prime and you do do enough Sortie to support the grind to stage 4 and beyond, then you will be rewarded with an incredible polearm.
![]() Shining One Even easier to obtain than Trishula and can be very competitive with the REMAP options. Damage from Impulse Drive scales well with WSD and crit.
Shining One Even easier to obtain than Trishula and can be very competitive with the REMAP options. Damage from Impulse Drive scales well with WSD and crit.
![]() Aram If you find yourself needing a full subtle blow kit on Dragoon then Path B will be the way to go. It simply won't compete with the other polearms on damage, however.
Aram If you find yourself needing a full subtle blow kit on Dragoon then Path B will be the way to go. It simply won't compete with the other polearms on damage, however.
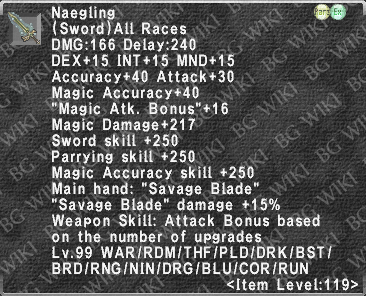
![]() Naegling Love it or hate it, it's likely here to stay. Dragoon's tp generation and weapon skill damage potential are a lethal combination with a Naegling equipped. Really shines in segment runs where your main goal is kill each target in a single weapon skill. Dragoon does only come with a C- Sword rating so accuracy may be a concern, especially at low to medium master levels. Also always useful for those fights where everyone is using Savage Blade in order to avoid skillchaining.
Naegling Love it or hate it, it's likely here to stay. Dragoon's tp generation and weapon skill damage potential are a lethal combination with a Naegling equipped. Really shines in segment runs where your main goal is kill each target in a single weapon skill. Dragoon does only come with a C- Sword rating so accuracy may be a concern, especially at low to medium master levels. Also always useful for those fights where everyone is using Savage Blade in order to avoid skillchaining.
![]() Mafic Cudgel The only club option. Use it to slap skeletons in Odyssey C.
Mafic Cudgel The only club option. Use it to slap skeletons in Odyssey C.
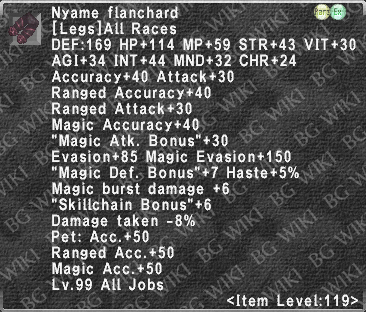
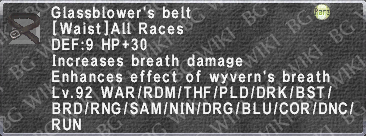
Job-Specific Armor
Note: The augments on Relic pieces, and some special attributes (eg Ancient Circle +1) are available at the base 119 version of the item. If the piece is only used for this purpose, then you do not need to fully upgrade the item to +3 to gain those effects. The recommendations in "Upgrade?" box refer to my personal opinion on whether the item should go all the way to +3.
| Job Specific Equipment | ||
|---|---|---|
| Item | Upgrade? | Notes |
Vishap Armet +3 
|
Maybe | Could be a macro-piece for Spirit Link but at +3 we are only talking about an additional 16 hp restored. |
Vishap Mail +3 
|
Yes | Used for all jumps as it provides +39 TP per jump at +3. |
Vis. Fng. Gaunt. +3 
|
Yes | Used for all jumps as it provides +34 TP per jump at +3. |
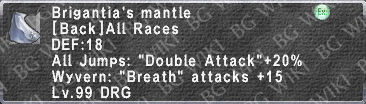
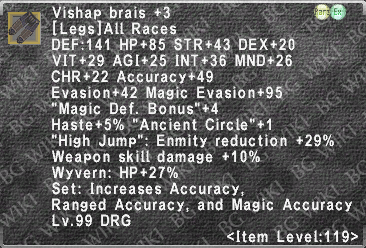
Vishap Brais +3 
|
Maybe | Used for Ancient Circle and Steady Wing. Very minimal upgrades past +1 (more wyvern hp translates into larger Steady Wing shields) |
Vishap Greaves +3 
|
No | No known use |
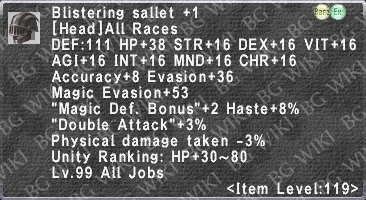
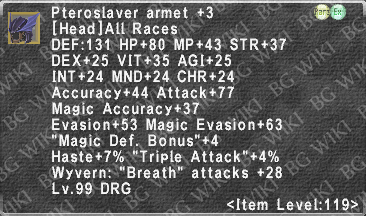
Ptero. Armet +3  Enhances Deep Breathing effect by 10% per merit level. |
Maybe | Increases the efficacy of Healing Breath, which is always nice in a pinch. |
Ptero. Mail +3  Enhances 'Spirit Surge' effect |
Maybe | A very interesting item. Augment adds 20 seconds to Spirit Surge which is nice. Perhaps more importantly, it should also be used whenever Call Wyvern is used, and also whenever entering a new zone with your pet in order to grant support job capabilities to the wyvern. |
Ptero. Fin. G. +3  Enhances 'Angon' effect |
Maybe | Increases Angon efficacy for enhanced defense down. 10% WSD maybe useful if lacking access to sufficiently ranked Nyame and/or Gleti hands. |
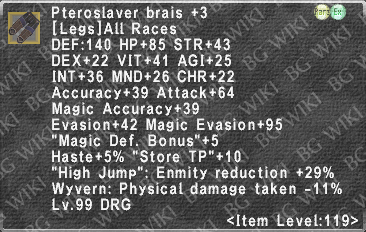
Ptero. Brais +3  Enhances 'Strafe' effect |
Yes | 10 Store TP coupled with Wyvern PDT makes this still a top tier TP piece. |
Ptero. Greaves +3  Enhances 'Empathy' effect |
Maybe | Used with Spirit Link to improve the duration of buffs transferred to the wyvern. Additionally, grants a large bonus to wyvern HP, making it useful for Steady Wing. |
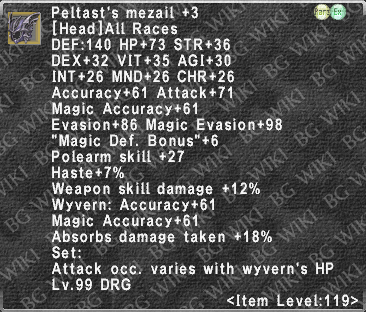
Peltast's Mezail +3 
|
Yes | 12% WSD, 27 Polearm skill and all the stats that come with empyrean +3. Default head slot for most weapon skill sets. |
Pelt. Plackart +3 
|
Yes | A whopping 14 Store TP, 10 PDL, and top tier stats. Amazing TP piece. |
Pel. Vambraces +3 
|
Yes | 7% double attack paired with 11% DT and all the glory of empyrean +3. Sign me up. |
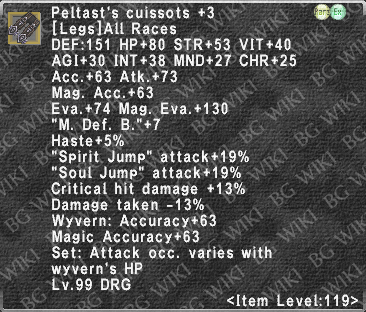
Pelt. Cuissots +3 
|
Yes | 13% Critical hit damage is impressive whenever you are using Drakesbane or wielding a Shining One |
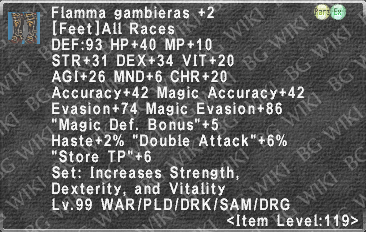
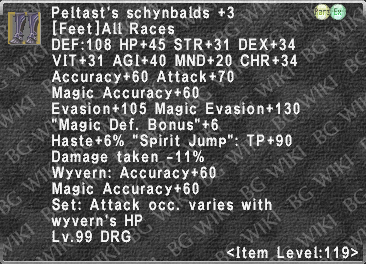
Pelt. Schyn. +3 
|
Maybe | Nice DT, and empy stats, but a bit lacking in oomph. Useful for Spirit Jump TP bonus. |
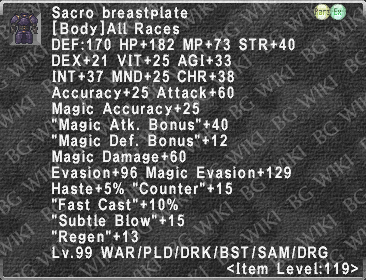
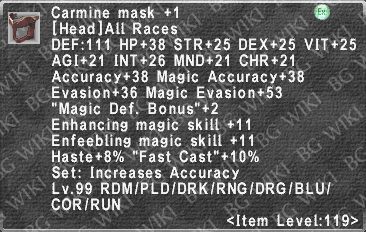
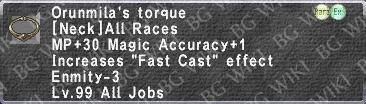
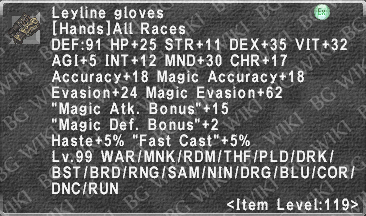
Engaged Sets
The goal of any engaged or "TP" set on Dragoon is to generate TP as quickly as possible (while not dying - and not letting your wyvern die!) in order to reach 1000 TP and be able to perform a weapon skill. The most important thing you can do as a damage dealer is stay alive - and so having the proper amount of defensive stats in your engaged set is paramount. Besides staying alive, the next two most important aspects to any engaged set are accuracy and haste. Much like your defensive needs, your accuracy needs will vary widely depending on exactly what you are fighting. In my opinion most (if not all) accuracy issues should try to remedied by 1. Higher master levels 2. Using the appropriate buffs and/or debuffs (BRD/GEO/COR/RDM) 3. Food. Note that any additional accuracy beyond the amount needed to reach the 95% cap is wasted.
Haste is the other critical component of a TP set, and you always want to come as close to the overall delay-reduction cap of 80% as possible, regardless of the encounter. Dragoon is in a unique position when it comes to haste due to the effects granted by the Wyvern (Dragoon Pet) - specifically 10% Job Ability (JA) Haste - and the ability to still obtain additional JA Haste via a support job (either Hasso or Last Resort). Most commonly, you will likely be /SAM, and have Hasso with 100% uptime providing an additional 10% JA haste - this means that you need only 17% gear haste to reach the overall 80% delay reduction with full magic haste. With /DRK and Last Resort giving 15% JA haste, the amount needed on gear falls even lower (but only during Last Resort). With all of that said, the sets provided in this guide (other than /DNC) still prioritize reaching the 25% gear haste cap for the simple reason that support jobs are not available in one of the two main components of end-game content - Odyssey Sheol Gaol.
Once you have achieved the necessary levels of gear haste for your support job and enough accuracy to reach the cap, you can begin looking to maximize your Store TP and Multi-Hit (double/triple/quad attack).
|


Weapon Skill Sets
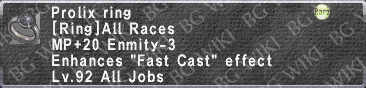
Weapon skill sets (except Diarmuid and Leg Sweep) are borrowed from the "All Jobs Damage Simulator and Gear Sets" created by Izanami. These sets are generated by his python simulator and have proven quite reliable and accurate in my experience. It is worth noting that some sets here include the Rigorous Grip +1, however since you can't switch grips when using a weapon skill I would suggest that Utu Grip is the default full time option on meaningful content. The 30 accuracy and 70 hp is likely more valuable than a small weapon skill damage increase, unless you are 100% certain you are accuracy capped. Like all things FFXI, you can and should adapt the situation at hand and the gear at your disposal. (Including fitting in your chosen TVR Ring, and slotting in your Pel. Earring +2 -- if you are so lucky)
Note: Use the 'Expand' link at the bottom of each section for more information about the sets.


Job Ability Sets
A quick note on these sets - it is possible to min/max some of these even further by including extremely niche pieces which will provide only negligibly increased utility. At this point in the game, I find myself weighing the benefits of an item against the inventory space needed to hold on to it. As such I choose not include things like "Acro" gear in the breath sets. Besides the inventory space, it is possible to be hit while activating a job ability or other breath, and I would argue that maintaining proper DT levels/MEVA throughout these sets is more important than eeking out a few dozen dps, or getting an extra 50 hp on your Steady Wing. Of course feel free to customize as needed. Check out Tatang's page for even more comprehensive sets.
|


Utility Sets
|


Starter Gear
Rather than try to create specific sets of gear for various levels of progression, I think it will be more beneficial to provide optimal sets to work toward paired with explanations of what to look for in each set - the "why" behind the set - and then let each player mix and match from their own gear to create gear sets that work for their current level of progression. Here I will try to show items for each slot which may be of use to up and coming Dragoons working toward the sets shown above.
One thing to note - I would urge any new player, or anyone looking to gear a Dragoon from zero to prioritize Sortie as much as possible. Getting 50,000 Gallimaufry and obtaining 5/5 Empyrean +2 will do more for you than almost anything else. The base stats (str/dex/meva/mdef/attack/acc) on all these items is very high compared to anything else you can reasonably obtain quickly. Even if you end up choosing to use some pieces where other (more geared) players may not (for example using Pelt. Cuissots +3 in your TP set) you will likely be in great shape to while you continue building up your collection of other items.
|
|
| ||||||||||||||||||||||||||||||||
|
|
| ||||||||||||||||||||||||||||
|
|
| ||||||||||||||||||||||||||||||||
|
|
| ||||||||||||||||||||||||
| ||||||||||
Skillchains
Here are some common self skillchain sequences a Dragoon can execute. ![]() denotates the need of Trishula to continue the Skillchain.
denotates the need of Trishula to continue the Skillchain.
 Stardiver → Stardiver = Darkness
- Stardiver → Sonic Thrust = Distortion → Stardiver = Darkness → Stardiver = Umbra
- Penta Thrust → Stardiver = Transfixion → Sonic Thrust = Distortion → Stardiver = Darkness → Stardiver = Umbra
- Stardiver → Camlann's Torment = Fragmentation → Drakesbane = Light → Camlann's Torment = Light ( creates Radiance instead of double light)
- Stardiver → Sonic Thrust = Distortion → Drakesbane = Fusion → Stardiver = Gravitation → Camlann's Torment = Fragmentation → Drakesbane = Light → Camlann's Torment = Light
Resources
- Tatang's User Page - Lots of good dragoon knowledge. I only found this while working on this guide. Some great resources here.
- All Jobs Damage Simulator and Gearsets by Izanami - great simulation based Weapon Skill sets for all jobs.
- The "Old" Dragoon Guide - Spicyryan's og guide. Still available on the Wayback Machine!
